|
Tutorial
Wanna learn from me? Of COURSE you do!
This is how to color your black and white lineart using Paint Shop Pro v7.0. It would also help with Adobe Photo
Shop, if you sort of convert things a little bit.
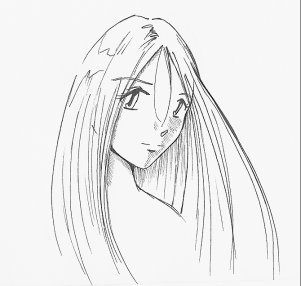
First, open your image up as a file. I'm using a quick sketch for details and such. Feel free to use
this image as practice as well.
1) Pick a light source. You should really do this before you start drawing, but sometimes you don't need to until
this point. Since I've already added some hatched lines and the shine of her eyes, then the light source is obviously
from the upper left. (Her upper right, actually, but for now, I'm using my point of view. It's less confusing.)
Anyway.
2) To make the colors a little darker and clearer, go to Colors>Adjust>>Highlight/Midtone/Shadows and make sure
"Linear Adjustment Method" is checked. Then change Shadow to 20, Midtone to 50, and Highlight to 100. (These are
the settings on my computer, you might need to change them to suit your image.) Click OK.
3) Go to Layers>Promote to Layer. Rename this as "Lineart."
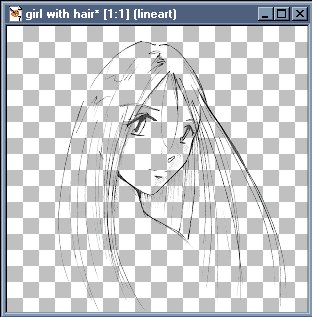
4) Go to Masks>New>>From Image. Make sure "Invert Mask Data" is checked. Click OK. Your image
will now look like this.
4) Select the Airbrush tool. Pick black as your color, make the size of the brush as high as it can go - same with
opacity and hardness. Color the ENTIRE IMAGE - don't skip ANYTHING. What this will do is darken your lineart for
you.
*A variation on this step is to choose a different color to color the lineart. This will be covered further down
the line in my tutorial.*
5) Go to Layers>New Raster Layer. Rename this layer as "Background" and then go to Layers>Arrange>>Move
to bottom. This means your background is behind your lineart, which is what you want. Fill color the background
white. You can change this later.
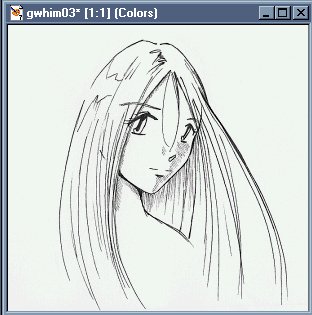
6) Go to Layers>New Raster Layer. Go to Layers>Arrange>>Move down. Your layers should be: Lineart
on top, then Colors, then Background on bottom. This is what your image will look like now. (Except that it will
be your own, and not mine.)
8) This is where the coloring actually begins! Yay! Aren't you EXCITED?
Anyway. Go to the Freehand tool, which is the little tool that looks like a noose. Why they use a noose for
a Freehand tool is beyond me, but I'm just writing the tutorial, not deciphering their reasoning behind being morbid.
But I digress.
You might want to zoom in at this point. If you have a scroll tool mouse, you can do this just by pushing it up,
which is really cool. Otherwise, you have to click the little magnifying glass, which is such a pain.
So in the Tool Options pallete for the Freehand (noose) tool, make sure the Selection Type is Point to Point, Feather
is at 0, and Antialias is checked. *Antialias preserves the smoothness of your drawing.*
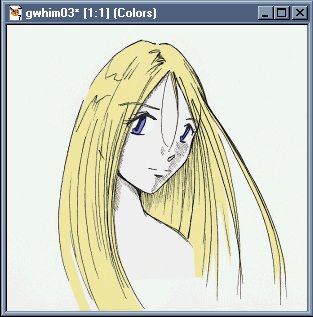
Start outlining a selection area of your picture. For example, the skin. Select an area that will be skin
color and when it's all outlined, right click. Then go to Fill Color, select the proper color for that area and fill
it in. Do this for the entire image until your picture looks like this:
**Note: Any area that you want to be white, make sure you color it white. Don't color the background in!!**
9) Go to Layers>New Raster Layer. Name this "Shadows" but don't click OK just yet! Right below the naming
box is "Blend Mode." Select "Multiply." In Paint Shop Pro v6.0, I think this is under "Properties." Now
you can click OK. If you ever forget to do this, just go up to Layers, select your layer, then click on Properties.
From there, you can change the Blend Mode.
10) Select the Eye Dropper tool. Collect the color of something that you will be adding shadows to. Pretty
much everything will have shadows, so you might as well start with something. I start with the skin colors first and
then I go from the biggest to the smallest areas. Do whatever works for you.
11) Select the Airbrush tool. Make it much smaller. (Because it is probably still on max from when you colored
the mask.) Change the Opacity to somewhere around 60 or so and the Hardness should be around 40 or 50. Just pick
something.
12) Color every place where the light will not hit. In my image, it would be below the chin, the far side of the
face, etc. *Don't be picky! You'll be blending soon so it's just a waste of time to be a perfectionist.*
You will see that even though you Eyedropped and are coloring the with the exact same color, it is darker. This is the
Multiply property working for you.
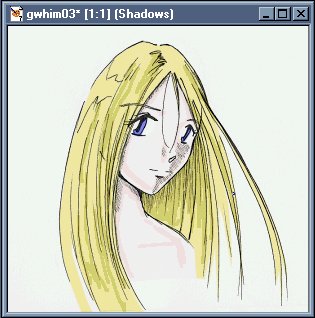
13) Follow these steps until every color in your image has proper shading. Sometimes you want a couple of
layers of shading. In this case, add another layer on top of the Shadows layer and name it something creative like "Darker
Shadings." Select Multiply as well and then when you do the eyedropper tool, go to the color pallete and click on your
color and then make it a little darker. Add the darker shadings then.
It will look something like this when you're finished:
14) Now select the Retouch tool. It's the one that looks like a finger. I use the finger a lot. It's
my favorite tool! In theTool Options palette, click on the second tab and select "Smudge." Go back to the tab
that looks like a finger and make sure the size is only slightly greater than or equal to the size you used on the airbrush.
Change Opacity to about 60 and Hardness from 40-50. Now blend your shaded lines. Be very slow and careful.
You might need to use the Undo a lot. This is a kind of fun step and it lets you see how well your drawing is coming
along.
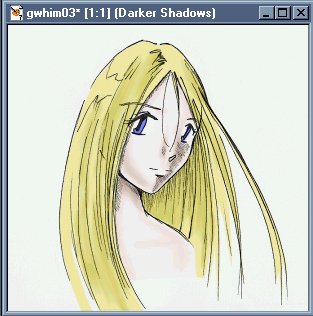
When you're done with this step, zoom out and make sure everything looks smooth. When you're done, it should look
like this. Note that I added a layer for darker shadows. You might need to do this as well, even several times.
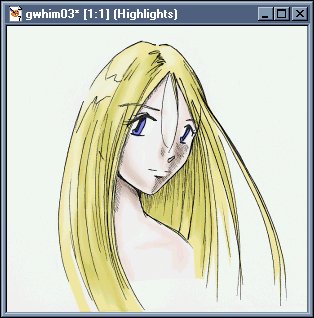
15) That was fun, wasn't it? It really makes the image look good. Now the highlights, which are just
like the shadows, but opposite. Go to Layers>New Raster Layer. Rename this as "Highlights" and under Blend
Mode, select "Screen."
16) Do the Eyedropper thing, select your Airbrush tool, color everything where the light would come in contact with.
For example, the nose, the hair, etc. Don't worry too much about hair highlights because there is a really neat effect
you can do with this later on.
17) Blend your colors. The picture will look something like this now:
18) Hair Highlights. This is very cool. Go to Layers>New Raster Layer and put the Blend Mode as "Luminance."
Rename the layer as "Hair Highlights."
19) Select your airbrush tool and have the color be pure white. Then color on the hair in parts that you want to
be shiny. Then blend. Your picture will then look like this: *Keep in mind that this particular effect will
be much more prominent on darker hair.*

20) This is an optional step. I don't know how it will look on this image, so when it's done I will change it back.
But done on the right picture it can be very dramatic and look very cool.
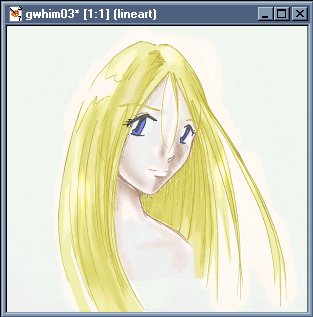
Select the "Lineart" layer. Pick the eyedropper tool and select the color for something. For example, the
hair, the skin, the clothes, etc. Make the color darker than whatever you've selected, because you will be outlining
that particular part with it. Then select the Airbrush tool and color the section of that color. Do it for every
section. For the eyes, choose a dark gray because the black looks very harsh when compared to the softer colors that
this finished product will produce. The image will look like this when you're done:
21) To change it back very easily, just airbrush over the whole image again with black. I'll keep it this way for
now.
22) Now we do the background. It's very easy, depending on what you want to do.
To create a background that has lots of detail in it, go to Layers>View>>Current Only, and draw your background
that way.
To make a quick and easy background that looks nice, you can fill color it with a gradient, do a quick airbrush color
swatch (which I will do here) and/or a drop shadow.
**To do a drop shadow, select your Colors layer, go to Effects>3D Effects>>Drop Shadow and select the color
of your drop shadow. On a dark background, I recommend using white to make it glowy and on a light background,
use a darker color. (Duh.) Select the Vertical and Horizontal attributes, the opacity and blur (which makes it
denser and such, depending on if you want a softer or harder shadow).**
To add a picture into the background, go to Selections>Select All, then to Edit>Paste>>Paste into Selection.
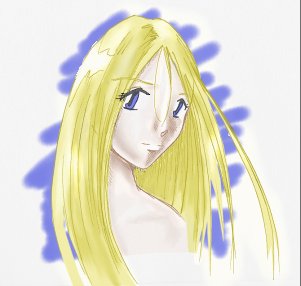
This is my finished picture.
|